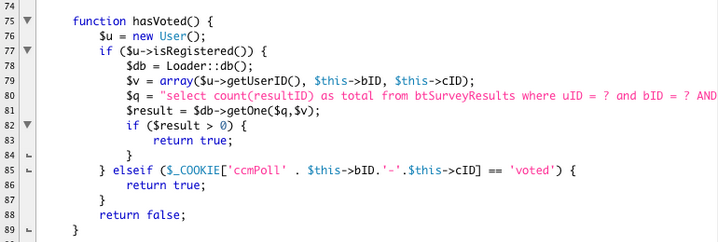
More complex database interactions
You’ve now learned how to modify a basic block. But what about blocks that require more complicated database interaction? The good news is that the automatic, easy way of creating working with block database tables, as in our more basic blocks, isn’t the limit-- you have full ability to run custom queries. Best practice is to keep this logic within your block’s controller, passing only its results back to the view. A good example of a more complex database interaction would be the Survey block.
Blocks are the most granular piece of content you can place on a concrete5 site. A block can consist of just about anything-- a video, an image, a form or even just plain text. In this section, we'll take a look at what files basic block consists of and give an in-depth look at what each file is responsible for.
Core Blocks
concrete5 includes a number of basic blocks by default. We usually call these “core” blocks. They’re located in your_site_root/concrete/blocks, and can be overridden by copying them up into their proper overrides directory at your_site_root/blocks.
Custom Templates
Custom block templates can be created by making a folder named templates inside a block’s override folder. There are two standard file structures for custom templates.
The first way to set up your custom template is the most basic, but completely adequate for scenarios where you only need to overwrite view.php:
blocks/block_name/templates/template_name.php
If you need to override files other than view.php-- say you want to override some CSS or javascript from the original-- you’ll want to make a new subdirectory with your template’s name and put your modified view.php and other assets inside it:
blocks/block_name/templates/template_name/view.php
From the front end, the result of taking either approach is the same. To apply a custom template click any block on a page and choose “Custom Template” from the block edit menu. The view elements will be swapped out for your modified versions, immediately.
You’ll notice that some of the core blocks already include custom templates. Examples include the auto nav and page list blocks.
Custom Blocks
Custom blocks, like most other customizations, should be located in your site's overrides directory:
(your site root)/blocks
You can build an entire block in this directory without every having to touch another folder or worry about packaging it.
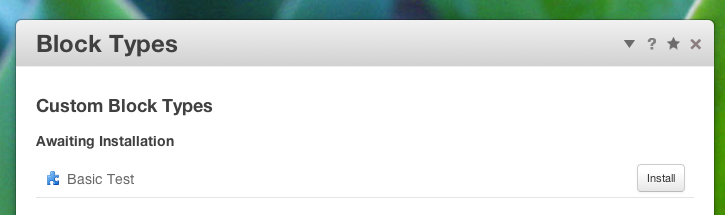
This example is from the “Basic Test” block example available as a download in the Creating a New Block Type article.
When your custom block is complete, the last step would be to install it in your concrete5 site. Installing custom blocks is managed through the dashboard. Assuming all is well, your block should be listed under “Awaiting Installation”. After you’ve installed it, it will be available to add to a page, just like any other block.
Block Anatomy
icon.png
This is a 16px by 16px png icon used to identify the block in the Add Block menu.
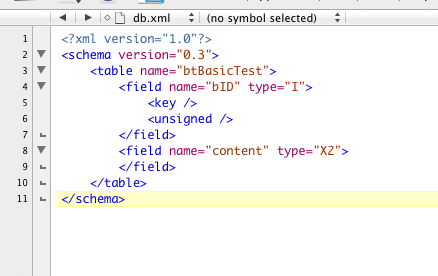
db.xml
This XML file defines the database tables we’ll need to store all the information the block uses. A good rule of thumb is that for every data field we intend to save, we’ll need to include a corresponding field in db.xml.
db.xml uses the ADMXL format for describing database tables (part of the ADODB database extraction layer the concrete5 uses). ADXML handles the creation of block database tables so that you don’t need to write out a slew of table creation, modification, etc statements. It also makes it easy to extend a block and add new tables along side pre-existing ones, or change characteristics of existing database tables. After adding a new field to db.xml, one can simply refresh the block schema from the dashboard and the new table will be created or modified as you’ve described.
Tip: refesh block schema by going to Dashboard > Blocks > Block Types and clicking the block you’d like to wotk with. On its detail page, click refresh to load the latest specifications from db.xml.
Let’s take a closer look. After installing the block on our site, let’s dive into the database to see exactly what happened on the back end:
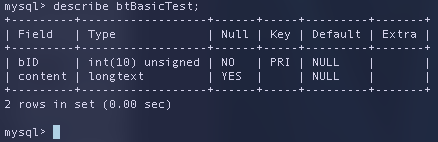
We’ve created a single table, btBasicTest. Inside, we have a bID field set as an interger, unsigned and primary. Similarly, the content field was created as type ‘longtext’.
The bID (block ID) field is mandatory, and it’s also the only piece of data that we’re not entering explicitly-- it’s created for us by concrete5.
controller.php
Let’s open up the block’s controller and take a look around. First off, you’ll notice where we extend the block controller class to our custom block:
class BasicTestBlockController extends BlockController
This matches our block’s folder name, basic_test. Watch out for case and spacing here! The new class must follow our standards and must extend the BlockController class.
Below are several variables that correspond to various parts of the block:
$btDescription = "A simple testing block for developers.";
This is the block’s description.
$btName = "Basic Test";
This defines the block name on the add menu, Block Types list, etc.
$btTable = 'btBasicTest';
Here, we specify the database table the block will be using to store settings and data.
Tip: This is required in versions of concrete5 prior to 5.5.0, but no longer required in subsequent versions, for blocks that only include a presentation layer and do not need to save any data.
$btInterfaceWidth = "350";
$btInterfaceHeight = "300";
These two lines declare the width and height of the block’s edit interface. These variables define the block edit overlay window’s dimensions.
add.php
This file gets called when we add the block to the page. Most blocks simply have add.php set to call form.php (or edit.php) as an include.
form.php (or edit.php in older blocks)
This displays the actual block edit options, and is coded with standard html-- though some developers will choose to favor the various concrete5 specific form helpers and Bootstrap-based styles available in the dashboard.
Here’s what edit.php includes, in our Basic Test block:
echo $form->label('content', 'Name');? echo $form->text('content', $content, array('style' => 'width: 320px')); This creates everything we see when we edit the block-- some text and a couple of form fields. Note that the form fields we’ve created have names matching the columns we set up in the database via db.xml. This allows concrete5 to update and retrieve data without requiring any additional data retrieval procedures.
Note that in the example above we’re using the form helper to create our form fields. While this provides an easy way to apply some basic formatting to our form input, it’s not a necessity. Plain, standard HTML style form elements will work as well, provided that the field names match what we havre in db.xml.
view.php
Every block includes view.php. It’s where we render content with HTML and PHP. In our test block, you’l notice it’s just:
echo $content;
$content is passed to the view layer automatically, so all that's left for us to do is echo it. As long as we’re referencing variable names that match our block’s database columns, there are no additional data retrieval steps needed.
Adding a field to the basic test block
Let’s say we want to add something else to this block-- perhaps an email link. Let’s start by adding a new field named “email” to db.xml: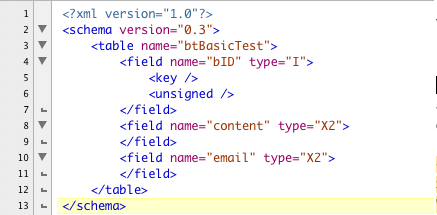
Then we’ll alter edit.php to include the new input field. Let’s just copy what already exists in the file, paste it in again, then alter it to meet our needs:
echo $form->label('content', 'Name'); echo $form->text('content', $content, array('style' => 'width: 320px'));?> echo $form->label('email', 'Email'); echo $form-->text('email', $email, array('style' => 'width: 320px')); The last code we’ll need to touch is in the view-- where a variable named $email contains whatever we’ve entered. I’ve added some code to make a standard HTML mailto: link and inserted a line break too, for the sake of readability:
echo $content;
The last thing we’ll need to do before we can see our changes is refresh the block database schema from Dashboard > Stacks & Blocks > Block Types. Click “Basic Test”, then hit the Refresh button.
Let’s put our block on a page and check it out. Now when we add or edit the block, we see our new field:
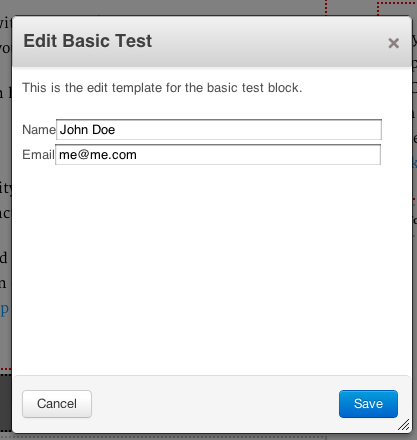
And when we click save, our email address is printed out below the name: